학습 리스트
- 배열
- 오브젝트(Object)
- if문
- switch문
- for문, while문
- 변수 scope : var, let, const
- 속성을 가리키는 방법
- HTML에서 JS액션주기
- jQuery
- jQuery 요약
- 메소드
- 실전
1. 배열
여러 값을 순서있게 저장하고 싶을 때 사용한다.
🚨주의 : sort()는 문자로 보고 사전식 정렬을 한다 (1->2->3->4->...->9->0)
<body>
  <script>
    var l = [10, 20, 30, 40, 50];
    document.write(l[0]);  //10
    document.write('<br>');
    document.write(l[1]);  //20
    document.write('<br>');

    document.write(l.slice(3));  //40, 50
    document.write('<br>');
    document.write(l.slice(0, 2));  //10, 20, 30
    document.write('<br>');
    document.write(l.slice(1, 3));  //20, 30, 40
    document.write('<br>');

    document.write(l.pop());  //50 (50을 꺼냄. 꺼낸 값을 return)
    document.write('<br>');
    document.write(l);  //10, 20, 30, 40
    document.write('<br>');
    //
    l.push(1000);
    document.write(l);  //10, 20, 30, 40, 1000
    document.write('<br>');

    document.write(l.join('!!'));  //10!!20!!30!!40!!1000  (string으로 반환)
    document.write('<br>');

    l.sort();
    document.write(l);  //10, 1000, 20, 30, 40 (사전식 정렬. 1->2->3->4->...)
    document.write('<br>');

    l.reverse();
    document.write(l);  //10, 20, 30, 40, 1000
    document.write('<br>');
  </script>
</body>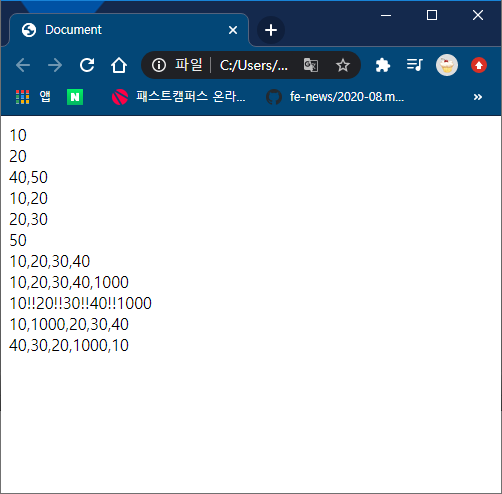
2. 오브젝트(Object)
(ex) 회원정보, 게시물 관리에 이용
</head>
<body>
  <script>
    var person = {
      name:{
        firstname:'hojun',
        lastname:'lee',
      },
      age:10,
      married:true,
    };
    document.write(person['name']);  //[object Object]
    document.write('<br>');
    document.write(person['name']['firstname']);  //hojun
    document.write('<br>');
    document.write(person['name']['lastname']);  //lee
    document.write('<br>');
    document.write(person['age']);  //10
    document.write('<br>');
    document.write(person['married']);  //true
    document.write('<br>');
  </script>
</body>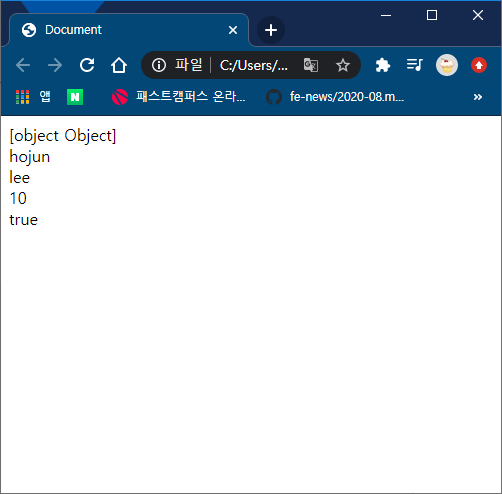
3. if문
반드시 위에서 아래로 순차적으로 작동한다.
<body>
  <script>
  var a = 10;
    if (false) {
      document.write('hello world');
    }else if (false) {
      document.write('else if one');
    }else if (false) {
      document.write('else if two');
    }
    else{
      document.write('else');
    }
  </script>
</body>
4. switch문
if문은 순차적인데에 비해, switch문은 바로 원하는 곳으로 한 번에 이동한다.
<body>
  <script>
  var a = 3;
  switch(a){
    case 1:
      document.write('1');
      break;
    case 2:
      document.write('2');
      break;
    case 3:
      document.write('3');
      break;
    default:
      document.write('default');
  }
  </script>
</body>
5. for문, while문
<body>
  <script>
    array = [10, 20, 30, 40, 50];
    for (var i = 0; i < array.length; i++){
      document.write(array[i]);
      document.write('<br>');
    }
    j = 0
    while (j < 10) {
      document.write(j);
      document.write('<br>');
      j++;
    }
  </script>
</body>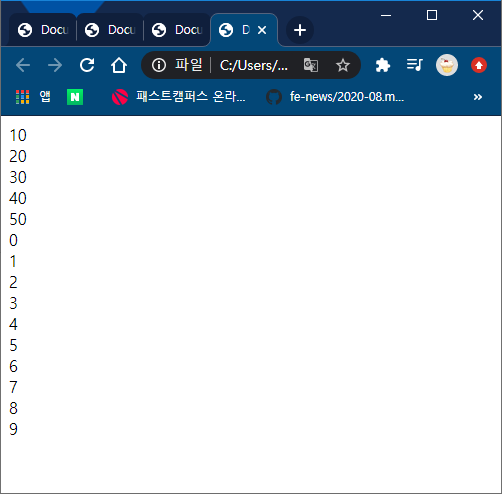
6. 변수 scope
- var: function scope. 한 함수 내에서 존재함
- let: block scope. 같은 블록 상에서만 존재함
- const: block scope. 주로 상수로 사용됨
<var>
<body>
  <script>
    var i = 10;
    if (i > 5){
      var j = 100;
    }else {
      var j = 1000;
    }
    document.write(j);	//100
  </script>
</body>
<let>
<body>
  <script>
    var i = 10;
    let k = 10000;
    if (i > 5){
      let j = 100;	//if블럭 내에서만 존재
    }else {
      let j = 1000;	//else블럭 내에서만 존재
    }
    document.write(j);	//출력X.
    document.write(k);	//10000. 같은 블럭 내에 있으므로 출력o
  </script>
</body>
<const>
<body>
  <script>
    var i = 10;
    const k = 10000;
    if (i > 5){
      const j = 100;
    }else {
      const j = 1000;
    }
    document.write(j);  //출력x
    document.write(k);  //10000
  </script>
</body>
var이 실행되지 않는 곳?
- 함수 안에서 생성된 변수를 밖에서 보는 경우 (X)
<body>
  <script>
    function f() {
      var fvar = 100000;
    }
    f()
    document.write(fvar);	//출력x
  </script>
</body>- 함수 밖에서 생성된 변수를 함수 안에서 보는 경우 (O)
<body>
  <script>
    var i = 10;

    function f() {
      i += 100000;
    }
    document.write(i);  //100010
  </script>
</body>
7. 속성을 가리키는 방법
1. 단일 element를 반환하는 함수
- document.getElementById('id')
- document.querySelector('query')
2. 복수의 element를 반환하는 함수
- document.getElementsByName('name')
- document.getElementsByClassName('className')
- document.querySelectorAll('query')
document.getElementsByClassName('className')을 이용하여 속성 가리키기
<body>
  <div class="one">hello world</div>
  <!-- .one.two#three -->
  <div class="one two" id="three">hello world two</div>
  <div class="one two four">hello world three</div>
  <script>
    k = document.getElementsByClassName('one');
    console.log(k);
    document.write(k['0']['innerHTML']);  //hello world
    document.write('<br>');
    document.write(k['2']['className']);  //one two four
  </script>
</body>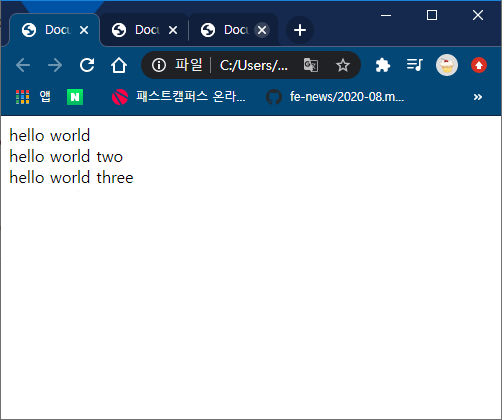
class = "one"을 포함한 elements가 모두 화면에 출력된다. 여기서 개발자모드 > Console 을 살펴보자.
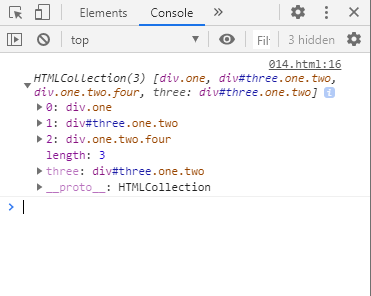
각 elements(0, 1, 2)들이 모두 나온다. 0은 오브젝트이므로, 오브젝트로 안의 속성을 잡아보자.
<!DOCTYPE html>
<html lang="en">
<head>
<meta charset="UTF-8">
<meta name="viewport" content="width=device-width, initial-scale=1.0">
<meta http-equiv="X-UA-Compatible" content="ie=edge">
<title>Document</title>
</head>
<body>
<div class="one">hello world</div>
<!-- .one.two#three -->
<div class="one two" id="three">hello world two</div>
<div class="one two four">hello world three</div>
<script>
k = document.getElementsByClassName('one');
console.log(k);
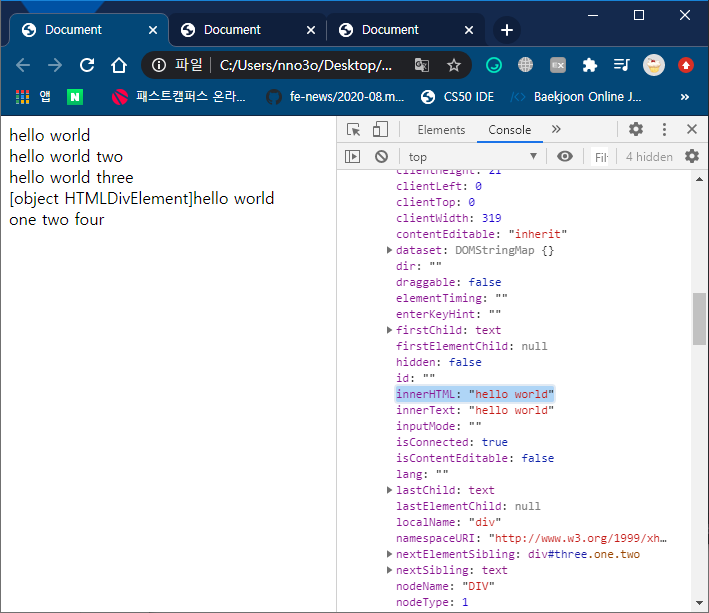
document.write(k['0']); //[object HTMLDivElement]: element라고 뜬다.
document.write('<br>');
document.write(k['0']['innerHTML']); //hello world
document.write('<br>');
document.write(k['2']['className']); //one two four
</script>
</body>
</html>
따라서 이처럼 여러개의 클래스를 잡고 변경시키고 싶은 경우, 복수의 element를 반환하는 함수로 만질 수 있다.
스타일을 변경하거나 element들을 동작시키도록 할 수 있다. 이는 아래서 살펴보자.
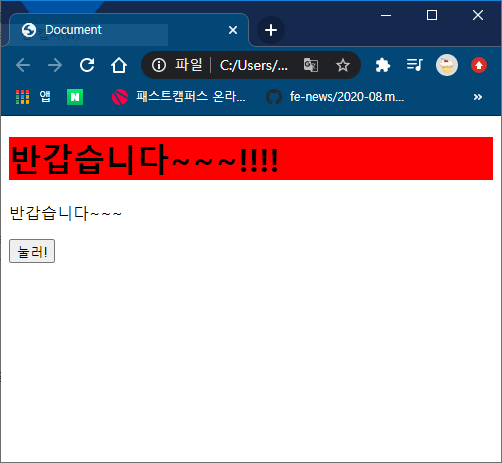
8. HTML에서 JS액션주기
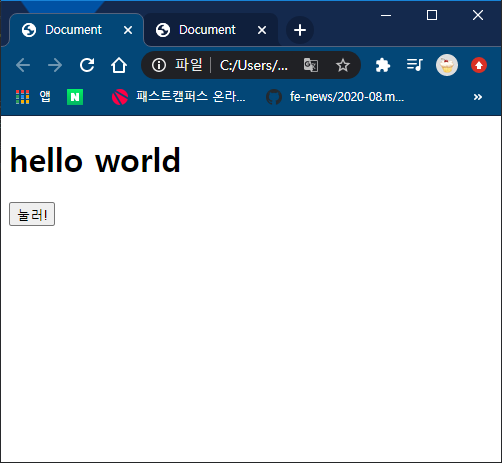
script에서, 어떤 버튼을 누르면 h1의 텍스트가 바뀌도록 해보자.
<body>
<h1 id="one">hello world</h1>
<button onclick="f()">눌러!</button> //onclick = 함수 or js코드
<script>
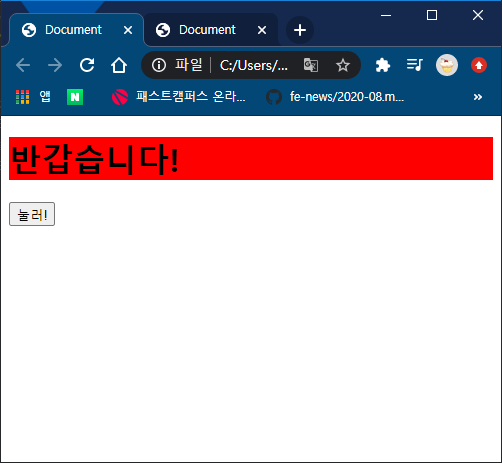
function f() {
//html코드에서 js액션을 줄 수 있게 된다.
document.getElementById('one').innerHTML = '반갑습니다!';
//스타일도 바꿀 수 있음
document.getElementById('one').style.backgroundColor = 'red';
}
</script>
</body>
</html>
이처럼 HTML코드에서 JS액션을 줄 수 있다.
주의점
css: background-color: skyblue;
js: backgroundColor = 'red';
<!DOCTYPE html>
<html lang="en">
<head>
  <meta charset="UTF-8">
  <meta name="viewport" content="width=device-width, initial-scale=1.0">
  <meta http-equiv="X-UA-Compatible" content="ie=edge">
  <title>Document</title>
  <style>
    p{
      background-color: skyblue;
    }
  </style>
</head>
<body>
  <h1 id="one">hello world</h1>
  <p>hello world</p>
  <button onclick="f()">눌러!</button>
  <script>
    function f() {
      //html코드에서 js액션을 줄 수 있게 된다.
      document.getElementById('one').innerHTML = '반갑습니다!';
      //스타일도 바꿀 수 있음
      document.getElementById('one').style.backgroundColor = 'red';
    }
  </script>
</body>
</html>
하지만 getElementById같은 긴 문자를 치는 것이 번거롭다. 더 강력한 방법으로 'jQuery'가 있다.
9. jQuery
- 엘리먼트를 선택할 수 있는 강력한 방법
- 선택된 엘리먼트를 효율적으로 제어할 수 있는 방법
jQuery CDN
라이브러리를 컴퓨터에 설치하지 않고도 사용할 수 있다.
jQuery CDN
The integrity and crossorigin attributes are used for Subresource Integrity (SRI) checking. This allows browsers to ensure that resources hosted on third-party servers have not been tampered with. Use of SRI is recommended as a best-practice, whenever libr
code.jquery.com

사이트에서 다음과 같이 코드를 복사하여 <script> 위에 붙여넣기하면 jQuery를 사용할 수 있게 된다.
jQuery 사용 방법
- $('name').속성명(변경할 값);
- class(.), id(#)를 name앞에 작성
jQuery의 효과
같은 기능을 단 몇 코드로 구현 가능하다. 간단하고 편리하다.
document.getElementById('one').innerHTML = '반갑습니다!'; ➡️ $('#one').html('반갑습니다!!!!');
<!DOCTYPE html>
<html lang="en">
<head>
  <meta charset="UTF-8">
  <meta name="viewport" content="width=device-width, initial-scale=1.0">
  <meta http-equiv="X-UA-Compatible" content="ie=edge">
  <title>Document</title>
</head>
<body>
  <h1 id="one">hello world</h1>
  <p>hello world</p>
  <button id="two" onclick="f()">눌러!</button>
  <!-- jQuery는
  1. 엘리먼트를 선택할 수 있는 강력한 방법
  2. 선택한 엘리먼트를 효율적으로 제어할 수 있는 방법 -->
  <!-- jQuery CDN 코드 -->
  <script
    src="https://code.jquery.com/jquery-3.5.1.js"
    integrity="sha256-QWo7LDvxbWT2tbbQ97B53yJnYU3WhH/C8ycbRAkjPDc="
    crossorigin="anonymous"></script>
  <script>
  //방법 (1)
    function f() {
      //id = #
      $('#one').html('반갑습니다~~~!!!!')
      document.getElementById('one').style.backgroundColor = 'red';
    }
    // 방법 (2) : click event
    $('#two').click(
      function f(){
        $('p').html('반갑습니다~~~')
      }
    )
  </script>
</body>
</html>
10. jQuery 요약
- $(#id) : id만 선택
- $(.class) : class만 선택
- $(h1.class) : h1에 class의 조합이 된 엘리먼트를 선택
- $(h1.classone.classtwo#idone#idtwo) : h1에 class="one", class="two", id="one", id="two"의 조합이 된 엘리먼트를 선택
filter (기본필터, 속성필터, 차일드필터, 컨텐츠필터)
- :even
- :odd
- :first
- :last
- :nth-child(2) : 2번째 것
- :nth-child(2n) : 짝수번째 것들
(ex) $('h1:first').html..... -> 여러 h1 중 마지막 h1만 변경됨
<예시1: 특정 class만 선택> - .one.three (class="one three")
<body>
  <h1 class="one">hello world one</h1>
  <h1 class="one two">hello world two</h1>
  <h1 class="one two three" id="four">hello world three</h1>
  <h1>hello world four</h1>
  <h1>hello world five</h1>
  <h1>hello world six</h1>
  <p>hello world</p>
  <button id="two" onclick="f()">눌러!</button>
  <script
    src="https://code.jquery.com/jquery-3.5.1.js"
    integrity="sha256-QWo7LDvxbWT2tbbQ97B53yJnYU3WhH/C8ycbRAkjPDc="
    crossorigin="anonymous"></script>
  <script>
    $('#two').click(
      function f(){
        $('h1.one.three').html('반갑습니다~~~');
      }
    )
  </script>
</body>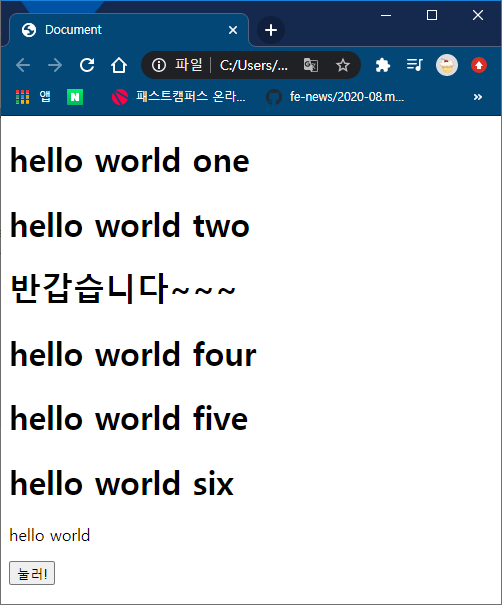
<예시2> - .one#four (class="one" id="four")
<body>
  <h1 class="one">hello world one</h1>
  <h1 class="one two">hello world two</h1>
  <h1 class="one two three" id="four">hello world three</h1>
  <h1>hello world four</h1>
  <h1>hello world five</h1>
  <h1>hello world six</h1>
  <p>hello world</p>
  <button id="two" onclick="f()">눌러!</button>
  <script
    src="https://code.jquery.com/jquery-3.5.1.js"
    integrity="sha256-QWo7LDvxbWT2tbbQ97B53yJnYU3WhH/C8ycbRAkjPDc="
    crossorigin="anonymous"></script>
  <script>
    $('#two').click(
      function f(){
        $('h1.one#four').html('반갑습니다~~~');
      }
    )
  </script>
</body>
</html>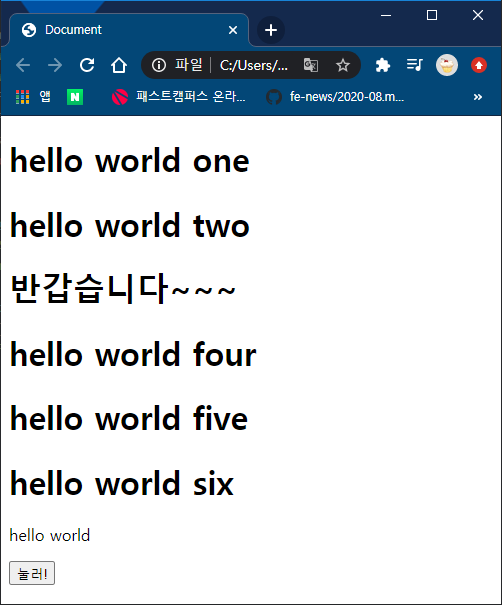
class="one two three" id="four"인 3번째만이 유일하게 둘다 가지고 있으므로 3번째 값만 변화한다.
<예시3> - .one (class="one")
<body>
  <h1 class="one">hello world one</h1>
  <h1 class="one two">hello world two</h1>
  <h1 class="one two three" id="four">hello world three</h1>
  <h1>hello world four</h1>
  <h1>hello world five</h1>
  <h1>hello world six</h1>
  <p>hello world</p>
  <button id="two" onclick="f()">눌러!</button>
  <script
    src="https://code.jquery.com/jquery-3.5.1.js"
    integrity="sha256-QWo7LDvxbWT2tbbQ97B53yJnYU3WhH/C8ycbRAkjPDc="
    crossorigin="anonymous"></script>
  <script>
    $('#two').click(
      function f(){
        $('h1.one').html('반갑습니다~~~');
      }
    )
  </script>
</body>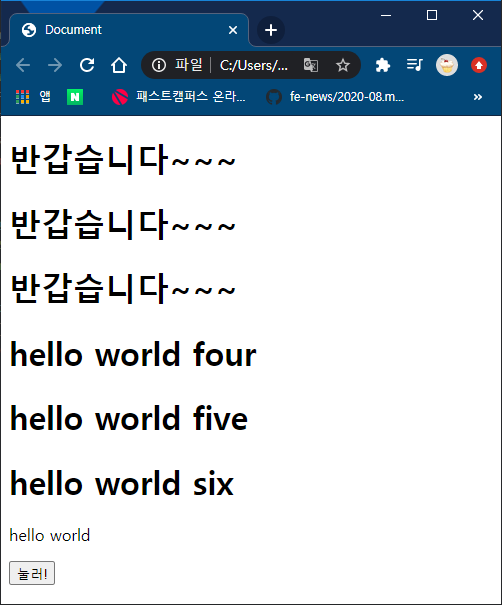
class="one"을 가진 1,2,3번째 값이 변화한다.
<예시4: filter> - :first :last
<body>
  <h1>hello world one</h1>
  <h1>hello world two</h1>
  <h1>hello world three</h1>
  <h1>hello world four</h1>
  <h1>hello world five</h1>
  <h1>hello world six</h1>
  <button id="two" onclick="f()">눌러!</button>
  <script
    src="https://code.jquery.com/jquery-3.5.1.js"
    integrity="sha256-QWo7LDvxbWT2tbbQ97B53yJnYU3WhH/C8ycbRAkjPDc="
    crossorigin="anonymous"></script>
  <script>
    $('#two').click(
      function f(){
        $('h1:first').html('반갑습니다~~~')
        $('h1:last').html('반갑습니다~~~')
      }
    )
  </script>
</body>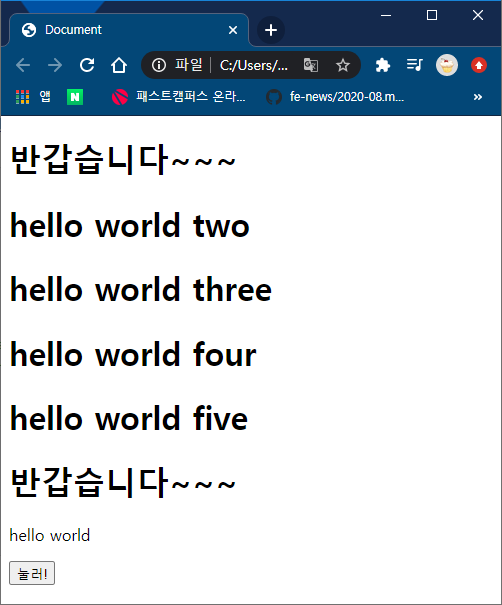
<예시5: filter> - :odd
<body>
  <h1 class="one">hello world one</h1>
  <h1 class="one two">hello world two</h1>
  <h1 class="one two three" id="four">hello world three</h1>
  <h1>hello world four</h1>
  <h1>hello world five</h1>
  <h1>hello world six</h1>
  <p>hello world</p>
  <button id="two" onclick="f()">눌러!</button>
  <script
    src="https://code.jquery.com/jquery-3.5.1.js"
    integrity="sha256-QWo7LDvxbWT2tbbQ97B53yJnYU3WhH/C8ycbRAkjPDc="
    crossorigin="anonymous"></script>
  <script>
    $('#two').click(
      function f(){
        $('h1:odd').html('반갑습니다~~~');
      }
    )
  </script>
</body>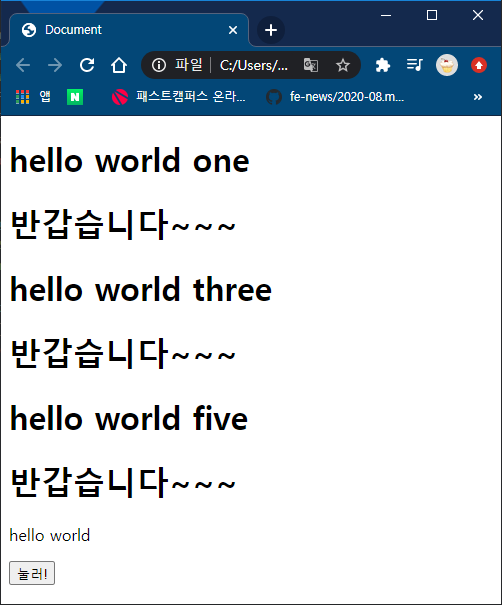
11. 메소드 (속성값 변경, DOM 탐색, css, 이벤트, 효과, etc)
- .text
- .html
- .val
- .hide
- .show
- .fadeIn
- .fadeOut
<예시1>
<body>
  <h1 class="one">hello world one</h1>
  <h1 class="one two">hello world two</h1>
  <h1 class="one two three" id="four">hello world three</h1>
  <h1>hello world four</h1>
  <h1>hello world five</h1>
  <h1>hello world six</h1>
  <p>hello world</p>
  <button id="two" onclick="f()">눌러!</button>
  <script
    src="https://code.jquery.com/jquery-3.5.1.js"
    integrity="sha256-QWo7LDvxbWT2tbbQ97B53yJnYU3WhH/C8ycbRAkjPDc="
    crossorigin="anonymous"></script>
  <script>
    $('#two').click(
      function f(){
        $('h1:first').html('<mark>반갑습니다~~~</mark>');
        $('h1:last').text('<mark>반갑습니다~~~</mark>');
      }
    )
  </script>
</body>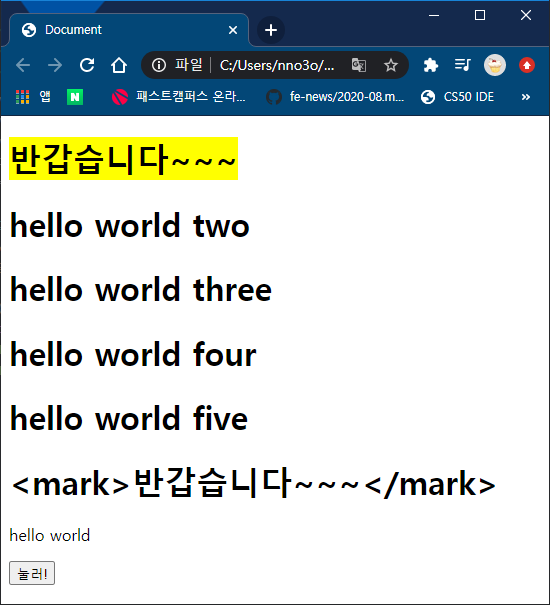
다음과 같이 첫 번째 값은 mark표시가 잘 들어갔지만, 마지막 값은 text만 들어간다.
<예시2 : fadeIn, fadeOut>
$('h1:first').html('<mark>반갑습니다~~~</mark>').fadeOut(3000).fadeIn(3000).fadeOut(3000).fadeIn(3000).fadeOut(3000).fadeIn(3000);다음과 같이 작성하게 되면 글자가 천천히 사라졌다 나타났다한다.
12. 실전
관리자로서 관리자 화면에서 여러 고객을 관리하는 창을 만들어보자. 현재 실제 유저 데이터가 없으므로 "json generator"을 통해 가져오자.
JSON Generator – Tool for generating random data
Generate any random data you want with power of agile templates and save it to our servers for later use.
www.json-generator.com
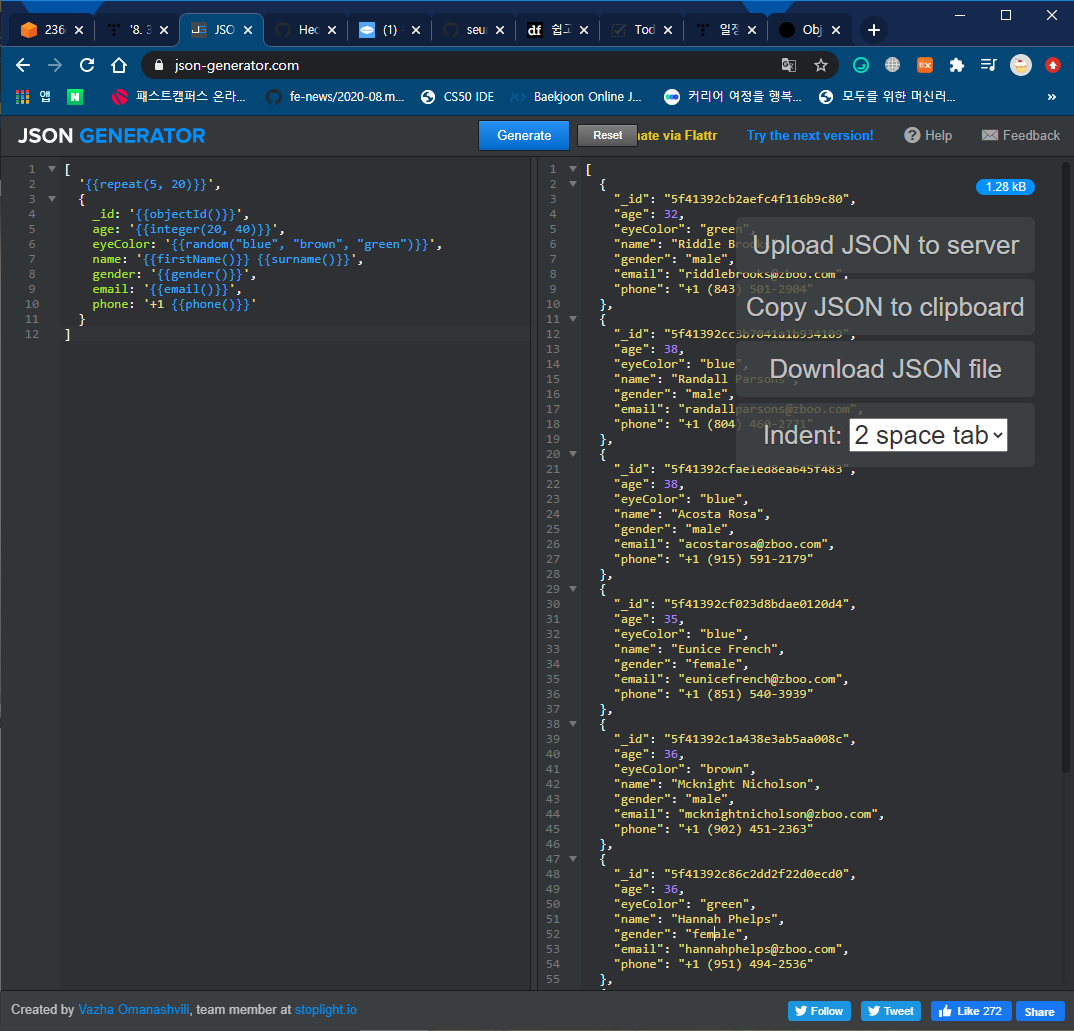
그리고 user.js를 만들어 이 값들을 저장해주자.
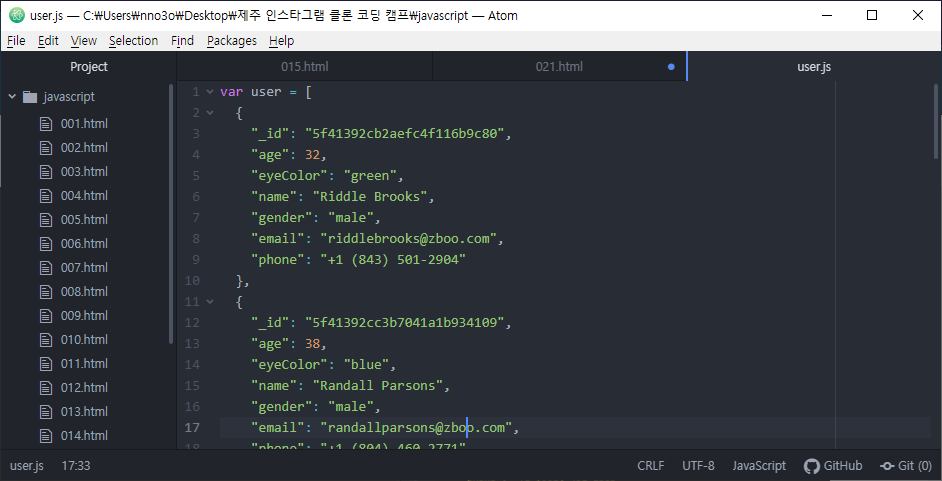
List안에 Object가 있는 형식으로 되어있다. 따라서 user의 첫 번째 값은 맨 위의 값이 될 것이다.
이는 같은 폴더 내에 있으므로 불러올 수 있다.
<!DOCTYPE html>
<html lang="en">
<head>
<meta charset="UTF-8">
<meta name="viewport" content="width=device-width, initial-scale=1.0">
<meta http-equiv="X-UA-Compatible" content="ie=edge">
<title>Document</title>
<style>
table, tr, td, th{
border:solid 1px black;
border-collapse: collapse;
}
th{ /*굵게*/
width: 15vw; /*화면에 가득참*/
}
</style>
</head>
<body>
<table>
<thead>
<tr>
<th>id</th>
<th>age</th>
<th>eyecolor</th>
<th>name</th>
<th>gender</th>
<th>email</th>
<th>phone</th>
</tr>
</thead>
<tbody></tbody>
<tfoot></tfoot>
</table>
<!-- jQuery -->
<script
src="https://code.jquery.com/jquery-3.5.1.js"
integrity="sha256-QWo7LDvxbWT2tbbQ97B53yJnYU3WhH/C8ycbRAkjPDc="
crossorigin="anonymous"></script>
<!-- user data -->
<script src="user.js"></script>
<script>
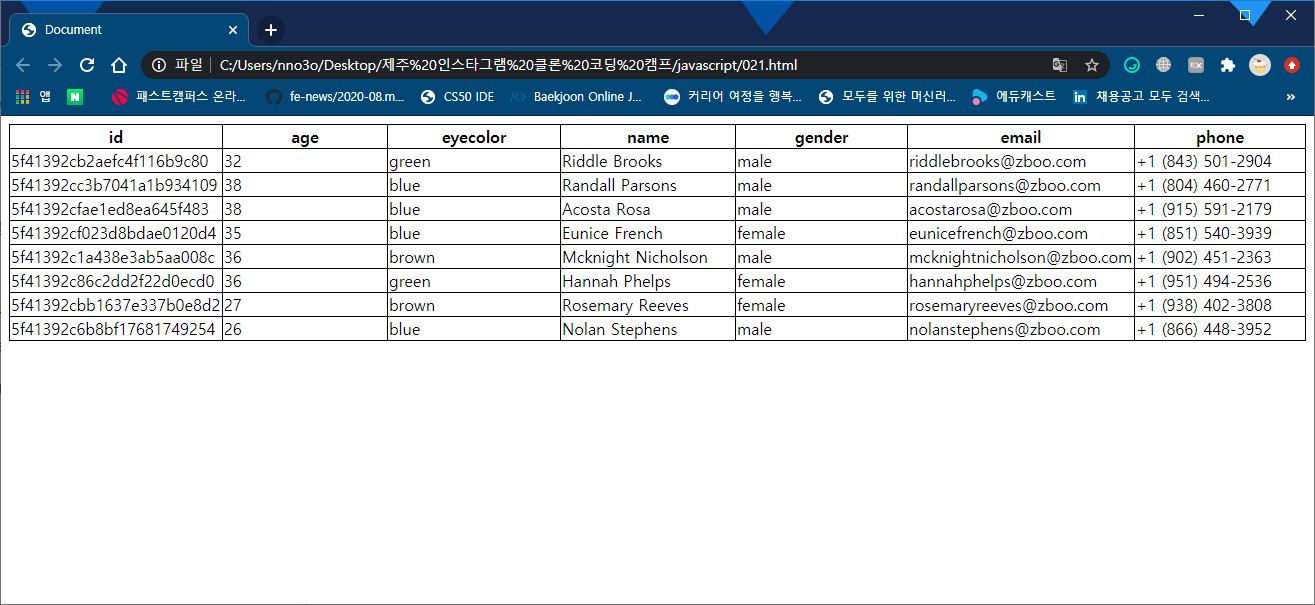
for (var i = 0; i < user.length; i++) {
$('tbody').append('<tr>');
$('tbody').append('<td>'+user[i]['_id']+'</td>');
$('tbody').append('<td>'+user[i]['age']+'</td>');
$('tbody').append('<td>'+user[i]['eyeColor']+'</td>');
$('tbody').append('<td>'+user[i]['name']+'</td>');
$('tbody').append('<td>'+user[i]['gender']+'</td>');
$('tbody').append('<td>'+user[i]['email']+'</td>');
$('tbody').append('<td>'+user[i]['phone']+'</td>');
$('tbody').append('</tr>');
}
// 하지만 변수에 저장하여 정의해두는 것이 좋다.
// 나중에 name을 눌렀을 떄 name순으로 정렬되도록 하고 싶을 경우도 있으니까.
</script>
</body>
</html>
'Education' 카테고리의 다른 글
| [부스트 코딩 뉴비 챌린지 2020] FINAL 미션03 : 중위 표기법을 후위 표기법으로 변환하는 프로그램 (0) | 2020.08.24 |
|---|---|
| [제주코딩베이스캠프] 웹개발 30분 요약 - 9. Python - f string 용법 (0) | 2020.08.23 |
| [제주코딩베이스캠프] 웹개발 30분 요약 - 7. 30분 요약시리즈 - JS 1부 (0) | 2020.08.22 |
| [부스트 코딩 뉴비 챌린지 2020] FINAL 미션 02 : N의 약수로 N을 구하는 프로그램 (0) | 2020.08.21 |
| [부스트 코딩 뉴비 챌린지 2020] week6_LIVE 강의 (0) | 2020.08.21 |

