강의 자료
[스파르타코딩클럽] 나홀로 코딩 패키지
튜토리얼
www.notion.so
01. 스파르타 튜토리얼
만들게 될 것
2020년-덕분에 행복했어요!
2020을 추억하며
spartacodingclub.shop
02. 오늘 배울 것
Hint
네이버 홈페이지에서 개발자 도구를 통해 실시간 검색어 1위의 단어를 변경해보자.
1. 내 컴퓨터에서만 바뀐다.
2. 인터넷을 끄면 페이지는 바로 꺼지지 않는다. -> 인터넷과는 관계 없이 이미 내가 가지고 있는 것이다.
3. 새로고침하면 원래 실시간 단어로 돌아온다.
sol
내가 서버로부터 받아온 것이기 때문이다.
result
1. 브라우저의 역할은 1) 서버에 요청하고, 2) 받아온 것(HTML, CSS, JavaScript)을 그대로 그려준다.
2. HTML은 뼈대, CSS는 꾸미기, JavaScript는 움직이게 하는 것(동작과 관련)
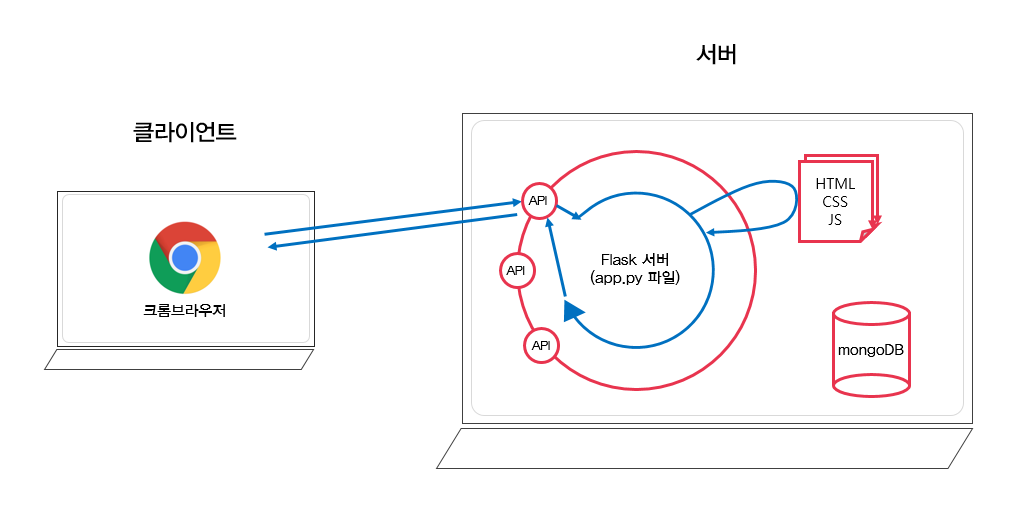
서버는 은행 창구처럼 밖에서 요청을 받을 수 있는 창구인 API를 열어둔다.
우리의 컴퓨터는 크롬 브라우저에서 그 창구에다가 요청을 한다.
그리고 API로부터 HTML, CSS, JavaScript를 받고 받은 그대로 그림을 그려준다.
03. HTML, CSS 기본 내용
- Visual Studio Code : 코딩을 편하게 도와주는 툴/프로그램 중 하나
- html:5 절로 자동 완성됨
1. <head> : 우리 눈에 안보이는 부분
(ex) title, 카카오톡에 공유할 때 떠야하는 이미지, 구글 검색 엔진이 내 웹페이지를 잘 가져갈 수 있도록 만들어둔 어떤 코드들
2. <body> : 우리 눈에 보이는 부분
<!DOCTYPE html>
<html lang="en">

<head>
    <meta charset="UTF-8">
    <meta name="viewport" content="width=device-width, initial-scale=1.0">
    <title>스파르타코딩클럽 | HTML 기초</title>
</head>

<body>
    <!-- 구역을 나누는 태그들 -->
    <div>나는 구역을 나누죠</div>
    <p>나는 문단이에요</p>
    <ul>
        <li> bullet point!1 </li>
        <li> bullet point!2 </li>
    </ul>

    <!-- 구역 내 콘텐츠 태그들 -->
    <h1>h1은 제목을 나타내는 태그입니다. 페이지마다 하나씩 꼭 써주는 게 좋아요. 그래야 구글 검색이 잘 되거든요.</h1>
    <h2>h2는 소제목입니다.</h2>
    <h3>h3~h6도 각자의 역할이 있죠. 비중은 작지만..</h3>
    <hr>
    span 태그입니다: 특정 <span style="color:red">글자</span>를 꾸밀 때 써요
    <hr>
    a 태그입니다: <a href="http://naver.com/"> 하이퍼링크 </a>
    <hr>
    img 태그입니다: <img src="https://www.google.com/images/branding/googlelogo/1x/googlelogo_color_272x92dp.png" />
    <hr>
    input 태그입니다: <input type="text" />
    <hr>
    button 태그입니다: <button> 버튼입니다</button>
    <hr>
    textarea 태그입니다: <textarea>나는 무엇일까요?</textarea>
</body>

</html>
2-1. <div> : 구역을 나눌 때 사용
2-2. <p> : 문단(Paragraph). 문단이 한 줄 띄어진다.
2-3. <ul> : unordered list. <li> list
2-4. <h1> : 페이지마다 하나씩 꼭 써주는 게 좋다. 그래야 검색엔진들이 가져갈 때 페이지 제목을 가져간다.
2-5. <h2>~<h6> : 소제목들
2-6. <span> : 특정 글자만 찝고 싶을 때
2-7. <a> : 하이퍼링크
2-8. <input> : 사용자가 작성할 수 있는 태그
2-8. <textarea> : 긴 글을 작성할 수 있는 태그
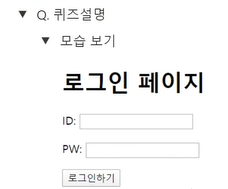
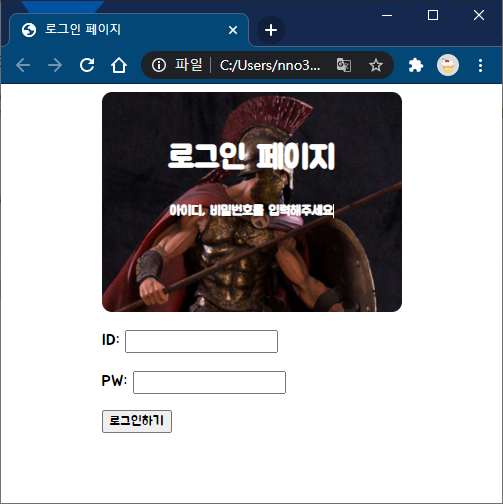
04. Quiz_간단한 로그인 페이지 만들어보기
만들어볼 것
만들기
<!DOCTYPE html>
<html lang="en">
<head>
    <meta charset="UTF-8">
    <title>로그인페이지</title>
</head>
<body>
    <h1>로그인 페이지</h1>
    <p>ID: <input type="text"/></p>
    <p>PW: <input type="text"/></p>
    <button>로그인하기</button>
</body>
</html>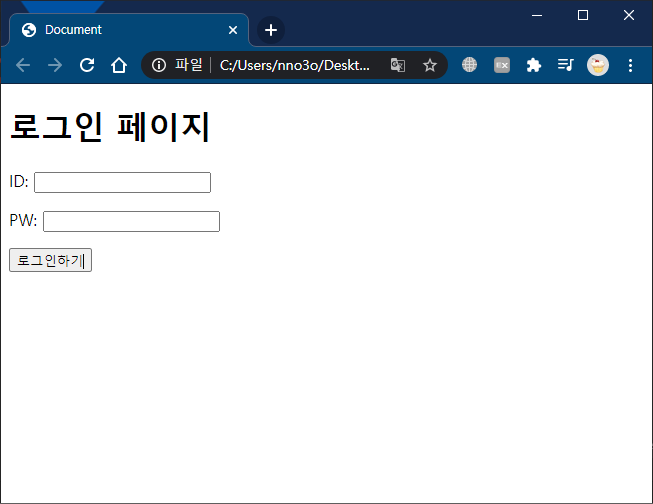
05. CSS 기초
<!DOCTYPE html>
<html lang="en">
<head>
    <meta charset="UTF-8">
    <title>로그인페이지</title>
    <style>
        .mytitle {
            color: red;
        }
    </style>
</head>
<body>
    <h1 class="mytitle">로그인 페이지</h1>
    <p>ID: <input type="text"/></p>
    <p>PW: <input type="text"/></p>
    <button>로그인하기</button>
</body>
</html>
속성들은 외우는 게 아니라, 필요할 때 그때그때 검색하여 보고 작성하면 된다.
06. 자주 쓰이는 CSS 연습하기
만들어볼 것
만들기
- margin: 내 바깥으로의 여백
- padding: 내 안쪽으로의 여백
- margin: auto; : 양 옆의 마진을 동일하게 주기
! ctrl + K + F : 자동 줄 맞춤
<!DOCTYPE html>
<html lang="en">
<head>
    <meta charset="UTF-8">
    <title>로그인 페이지</title>
    <style>
        .mytitle {
            background-color: green;
            width: 300px;
            height: 200px;

            color: white;
            text-align: center;

            /* background에서 세 줄은 항상 같이 작성 */
            background-image: url('https://www.ancient-origins.net/sites/default/files/field/image/Agesilaus-II-cover.jpg');
            background-size: cover;
            background-position: center;

            border-radius: 10px;

            /* 위로의 여백(text를 아래로 내리기) */
            padding-top: 20px;
        }

        .wrap {
            background-color: green;
            width: 300px;
            margin: auto;  /* 여백 동등하게 하기 */
        }
    </style>
</head>
<body>
    <div class="wrap">
        <div class="mytitle">
            <h1>로그인 페이지</h1>
            <h5>아이디, 비밀번호를 입력해주세요</h5>
       </div>
       <p>ID: <input type="text"/></p>
       <p>PW: <input type="text"/></p>
       <button>로그인하기</button>
    </div>
</body>
</html>
07. 폰트 입히기
구글 폰트
Google Fonts
Making the web more beautiful, fast, and open through great typography
fonts.google.com

<title> 아래에 <link>를 작성하고,
<style> 속에 폰트를 입히고 싶은 곳에 css를 작성한다.
    <title>로그인 페이지</title>

    <link rel="preconnect" href="https://fonts.gstatic.com">
    <link href="https://fonts.googleapis.com/css2?family=Jua&display=swap" rel="stylesheet">


    <style>
        * {
            font-family: 'Jua', sans-serif;
        }
        ...
! * { ... } 로 작성하는 경우, 모든 태그에 적용하겠다는 의미
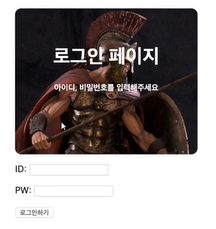
08. 숙제 설명
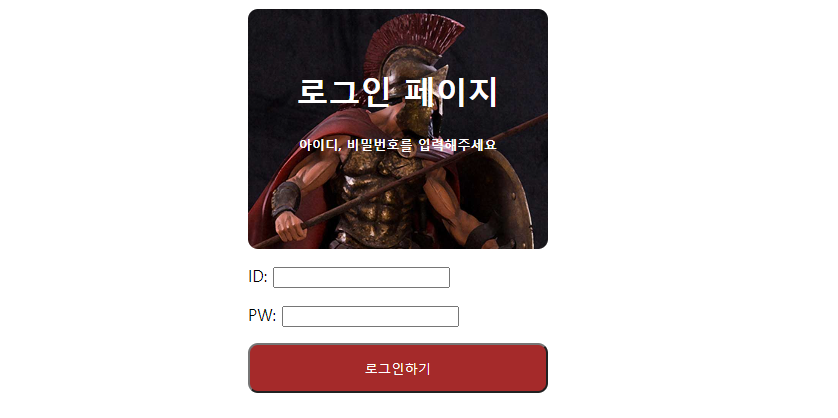
로그인 버튼 변경하여 사진과 같이 만들어주기
hint
1. width:300, height: 50;
2. background-color: brown
3. color: white
09. 숙제 제출

        .mybtn{
            height: 50px;
            width: 300px;
            color: white;
            background-color: brown;
            border-radius: 10px;
        }

        ...

        <button class="mybtn">로그인하기</button>
'Front-End: Web' 카테고리의 다른 글
| [웹 UI 개발 코칭스터디 1기] 1. HTML & CSS 기초 (0) | 2021.01.14 |
|---|---|
| 나홀로 코딩 패키지 - 2일차 (0) | 2020.12.28 |
| [CSS] position: absolute인 요소를 중앙 정렬하기 (0) | 2020.09.17 |
| [HTML] Jade 사용 방법 익히기 (0) | 2020.09.08 |
| 라우트, 라우터, 라우팅 (0) | 2020.09.08 |


