강의 자료
[스파르타] 신년운세 패키지
슬랙 가입 가이드
www.notion.so
수업 목표
- 서버와 클라이언트 역할에 대해 이해한다.
- HTML, CSS의 기초 지식을 이해한다.
- 신년운세 메인페이지를 완성한다!
01. 스파르타 튜토리얼
만들게 될 것
신년운세 by 르탄!
2021년 띠 별 운세를 알려드립니다
new-year.spartacodingclub.kr
02. 설치 프로그램
1) Chrome
Chrome 웹브라우저
더욱 스마트해진 Google로 더 심플하고 안전하고 빠르게.
www.google.com
2) Visual Studio Code (VS Code)
Download Visual Studio Code - Mac, Linux, Windows
Visual Studio Code is free and available on your favorite platform - Linux, macOS, and Windows. Download Visual Studio Code to experience a redefined code editor, optimized for building and debugging modern web and cloud applications.
code.visualstudio.com
03. 오늘 배울 것
서버/클라이언트/웹의 동작 개념
2020/12/28 - [Web] - [스파르타코딩클럽] 나홀로 코딩 패키지 - 1일차
-> '02. 오늘 배울 것' 참고

04. HTML, CSS 기본 내용
HTML과 CSS의 개념
HTML은 뼈대, CSS는 꾸미기
HTML은 구역과 텍스트를 나타내는 코드. 뼈대. HTML 내 style 속성으로 꾸미기를 할 수 있지만, 긴 세월동안 이것을 한데 모아볼 수 있는 CSS 파일이 탄생하게 되었다. HTML 코드 내에서 CSS 파일을 불러와서 적용한다.
CSS를 잘 사용할 줄 아는 것과 '예쁘게' 만드는 것은 다른 영역이므로 ('특정 글자를 초록색으로 바꾼다'라는 개념이지, 어떤 초록색이 가장 예쁜지 알아보는 것이 아니다), 많은 경우 웹디자이너나 퍼블리셔에게 의존하게 된다.
HTML 기초
head : 페이지의 속성 정보.
- meta, script, link, title, ...
body : 실제적인 내용 페이지의 내용.
- <h1>~<h6>
- <p> : block
- <span> : inline
- <div>
- <hr> : 수평선
- <span>
- <a> : 하이퍼링크
- <input>
- <ul> / <ol> ➡ <li>
- <button>
- <textarea>
<!DOCTYPE html>
<html lang="en">

<head>
    <meta charset="UTF-8">
    <meta name="viewport" content="width=device-width, initial-scale=1.0">
    <title>스파르타코딩클럽 | HTML 기초</title>
</head>

<body>
    <!-- 구역을 나누는 태그들 -->
    <div>나는 구역을 나누죠</div>
    <p>나는 문단이에요</p>
    <ul>
        <li> bullet point!1 </li>
        <li> bullet point!2 </li>
    </ul>

    <!-- 구역 내 콘텐츠 태그들 -->
    <h1>h1은 제목을 나타내는 태그입니다. 페이지마다 하나씩 꼭 써주는 게 좋아요. 그래야 구글 검색이 잘 되거든요.</h1>
    <h2>h2는 소제목입니다.</h2>
    <h3>h3~h6도 각자의 역할이 있죠. 비중은 작지만..</h3>
    <hr>
    span 태그입니다: 특정 <span style="color:red">글자</span>를 꾸밀 때 써요
    <hr>
    a 태그입니다: <a href="http://naver.com/"> 하이퍼링크 </a>
    <hr>
    img 태그입니다: <img src="https://www.google.com/images/branding/googlelogo/1x/googlelogo_color_272x92dp.png" />
    <hr>
    input 태그입니다: <input type="text" />
    <hr>
    button 태그입니다: <button> 버튼입니다</button>
    <hr>
    textarea 태그입니다: <textarea>나는 무엇일까요?</textarea>
</body>

</html>
(+) Extensions - open in browser

지금 작성 중인 파일을 바로 웹 브라우저로 열 수 있게 해준다.
- 단축키: Alt + B
05. CSS 기초
<!DOCTYPE html>
<html lang="en">
<head>
    <meta charset="UTF-8">
    <meta name="viewport" content="width=device-width, initial-scale=1.0">
    <title>2021년 신년운세</title>
    <style>
        .mytitle {
            color: darkred;
            text-align: center;
        }
        .mytitle > h1 {
            font-size: 56px;
            margin-bottom: 0;
        }
    </style>
</head>
<body>
    <div class="mytitle">
        <h1>2021년 신년운세</h1>
        <h2>by 르탄, 믿거나 말거나~</h2>
    </div>
</body>
</html>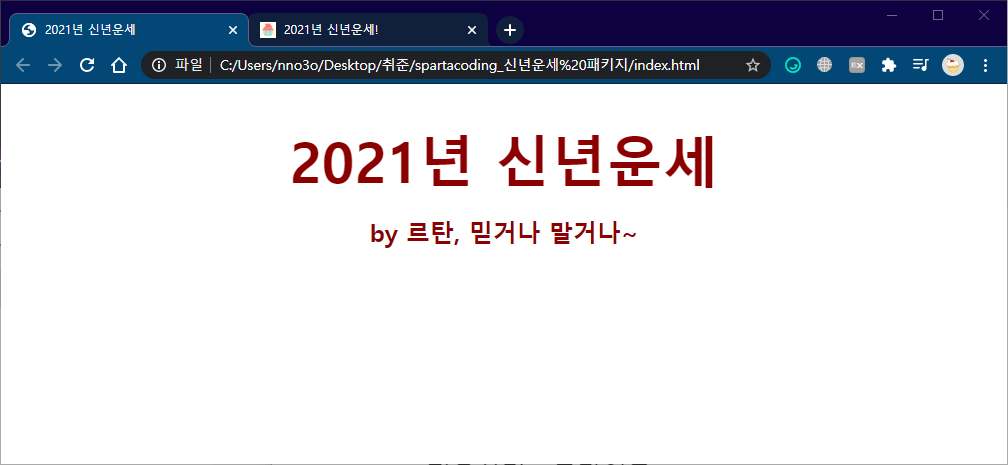
06. CSS 적용하기 - 배경
        body {
            background-color: ivory;
            background-image: url(https://new-year.spartacodingclub.kr/images/pattern.png);
            background-position: 600px 100px;
            background-repeat:no-repeat;
        }
07. 폰트 입히기
구글 웹 폰트 입히기
Google Fonts
Making the web more beautiful, fast, and open through great typography
fonts.google.com
1. 위의 페이지에 들어가서 원하는 글꼴을 클릭한다.
2. click 'Select this style'
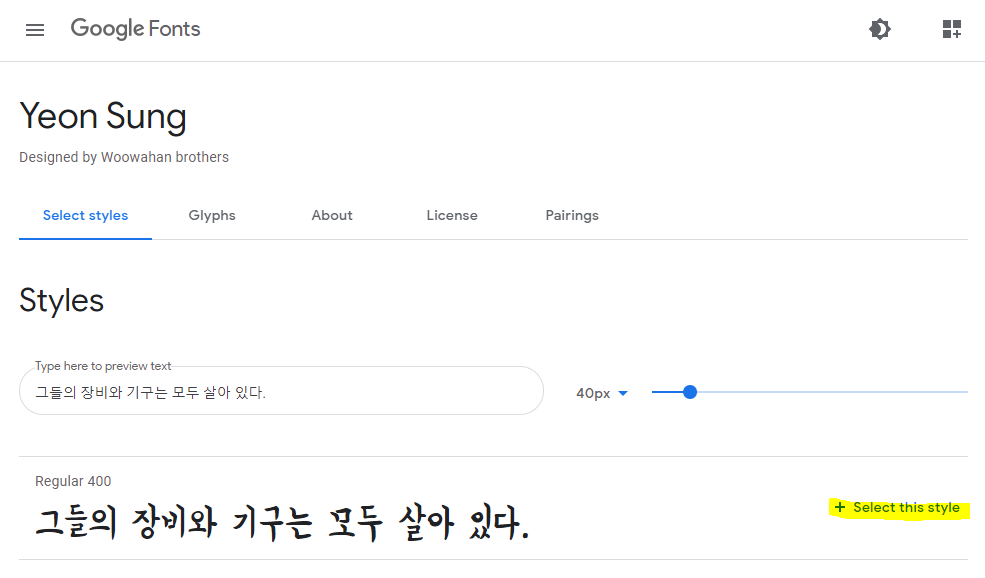
3. 코드 추가하기
- <link>
- <head>내에 작성하는 태그 (HTML을 온전히 보여주기 위해 필요한 것들을 정의할 때 쓴다)
- 작성하게 되면, 필요한 폰트 파일들을 알아서 웹 브라우저가 다운로드하게 된다.

결과
<head>
    <link rel="preconnect" href="https://fonts.gstatic.com">
    <link href="https://fonts.googleapis.com/css2?family=Yeon+Sung&display=swap" rel="stylesheet">
    <style>
        * {
            font-family: 'Yeon Sung', cursive;
        }
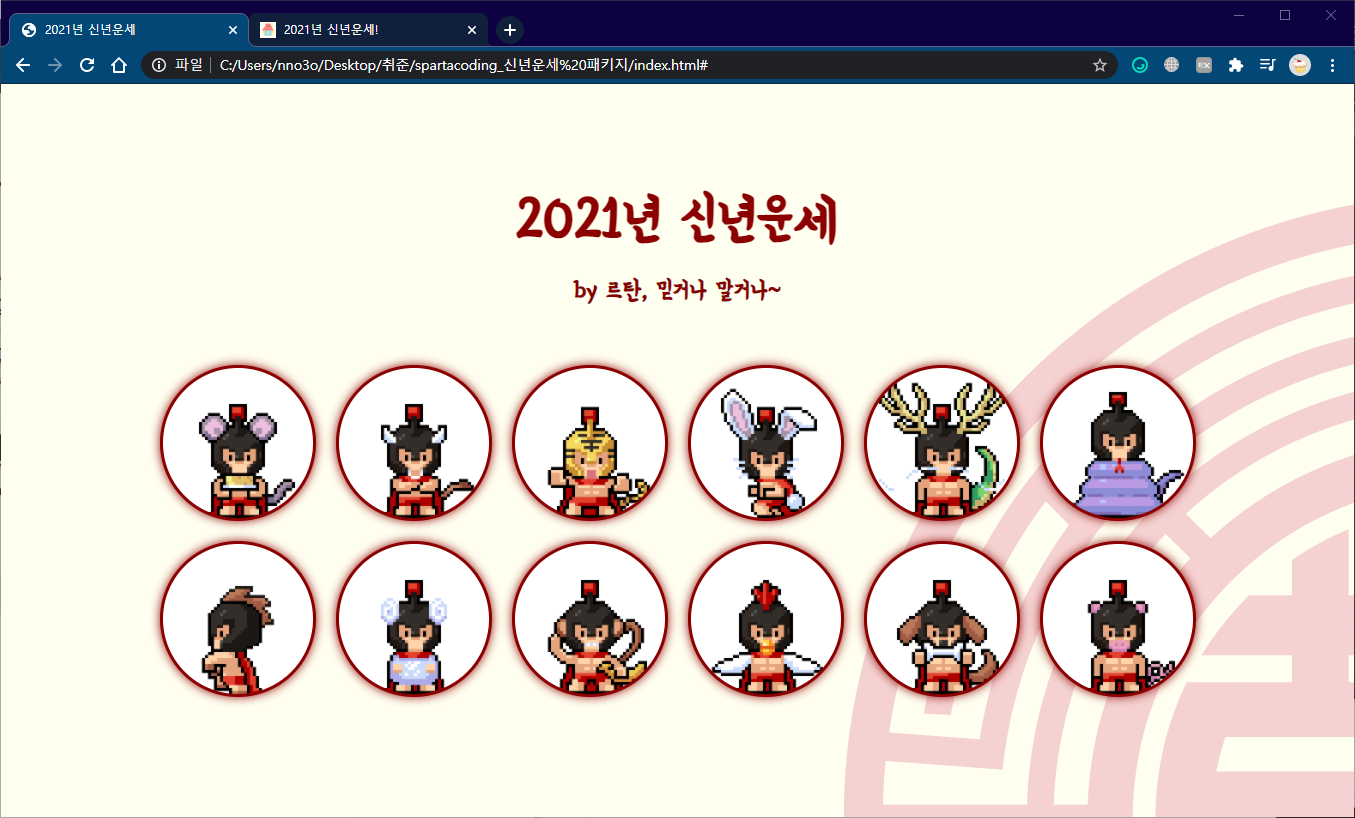
08. CSS 적용하기 - 르탄이들 (1)
만들 것
한 줄에 6개의 르탄이가 줄 맞춰 있어요!
전략
- 12개의 르탄이들을 a태그로 만들어 주고, 이들 전체를 <div>로 묶는다.
- 그리고 <div>에 display:flex 속성을 이용하여 줄을 맞춘다.
1. 원만들기
<a href="#"></a>href="#" : 그대로 있어라!
<div class="rtans">
<a href="#"></a>
<a href="#"></a>
<a href="#"></a>
<a href="#"></a>
<a href="#"></a>
<a href="#"></a>
<a href="#"></a>
<a href="#"></a>
<a href="#"></a>
<a href="#"></a>
<a href="#"></a>
<a href="#"></a>
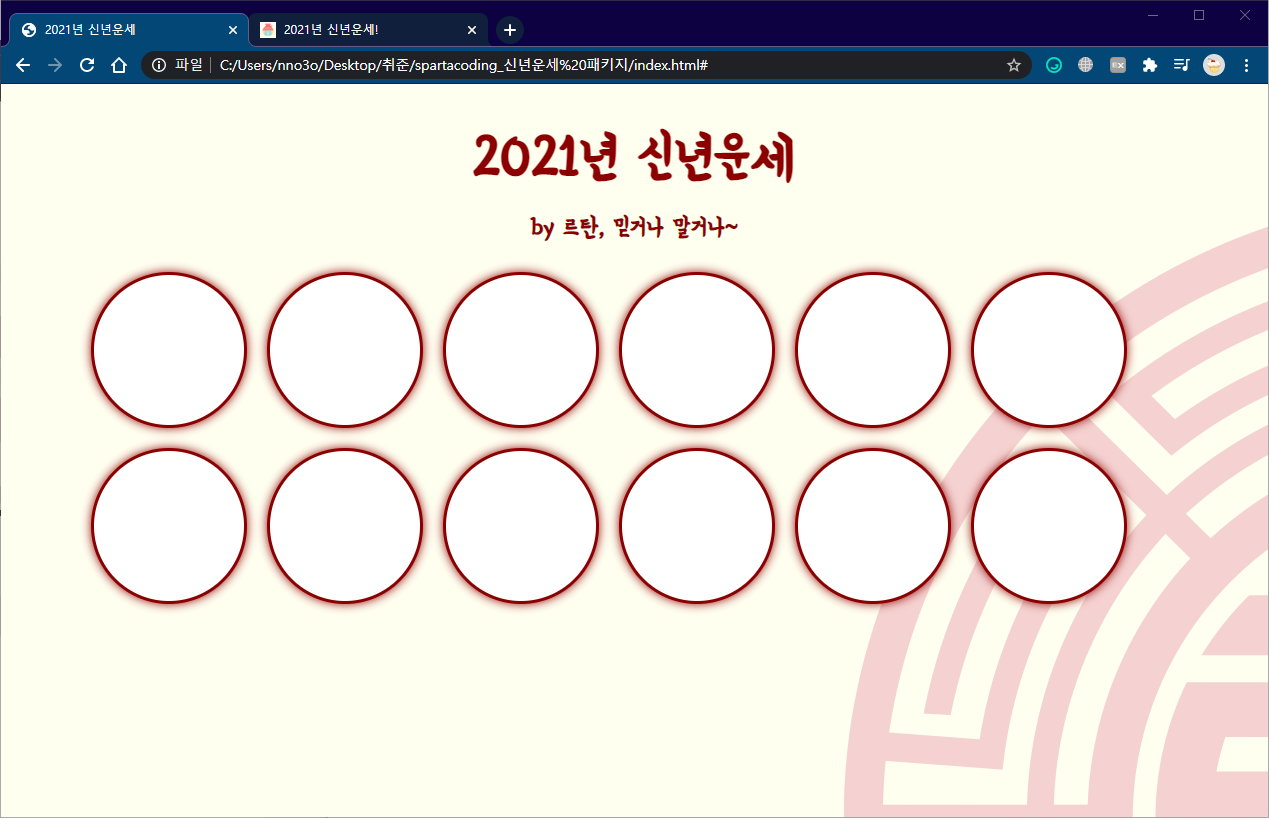
</div>현재 여기까지 진행했을 때, 화면에 변화된 점이 없다. 왜냐하면 아무것도 입력하지 않은 상태(글자x)에서는 아무것도 표시되지 않기 때문이다. 따라서 아무것도 없어도 너비와 부피를 가질 수 있도록 css처리를 해주어야 한다.
        .rtans > a {
            display: block;
            width: 150px;
            height: 150px;
            border:3px solid darkred;
            background-color: white;
            border-radius: 150px;
            box-shadow: 0 0 10px 0 darkred;
        }
2. display:flex
특정 div안에 있는 요소들을 정렬할 때 사용한다.
작성해야 할 세가지
- display: flex;
- flex-direction: row/column;
- justify-content: center/left/right;
        .rtans {
            display: flex;
            flex-direction: row;
            justify-content: center;
        }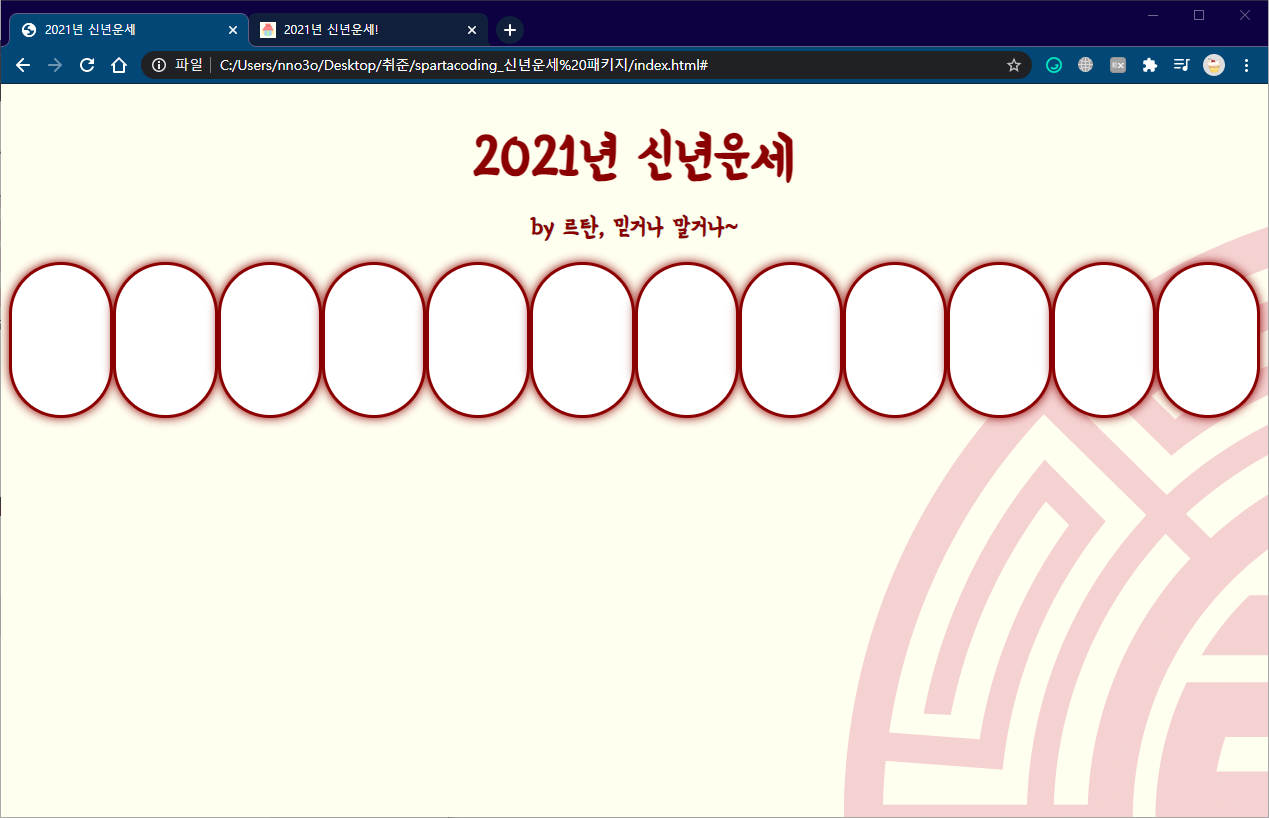
하지만 한 줄에 모든 요소들이 나열하게 되니 위의 그림과 같이 원이 찌그러진다.
여기서 flex-wrap: wrap 속성을 주면, 각각의 요소들이 원래 기존의 넓이들을 갖도록 세팅할 수 있다. 즉, 가로 길이만큼만 알맞게 원이 들어가게 된다.
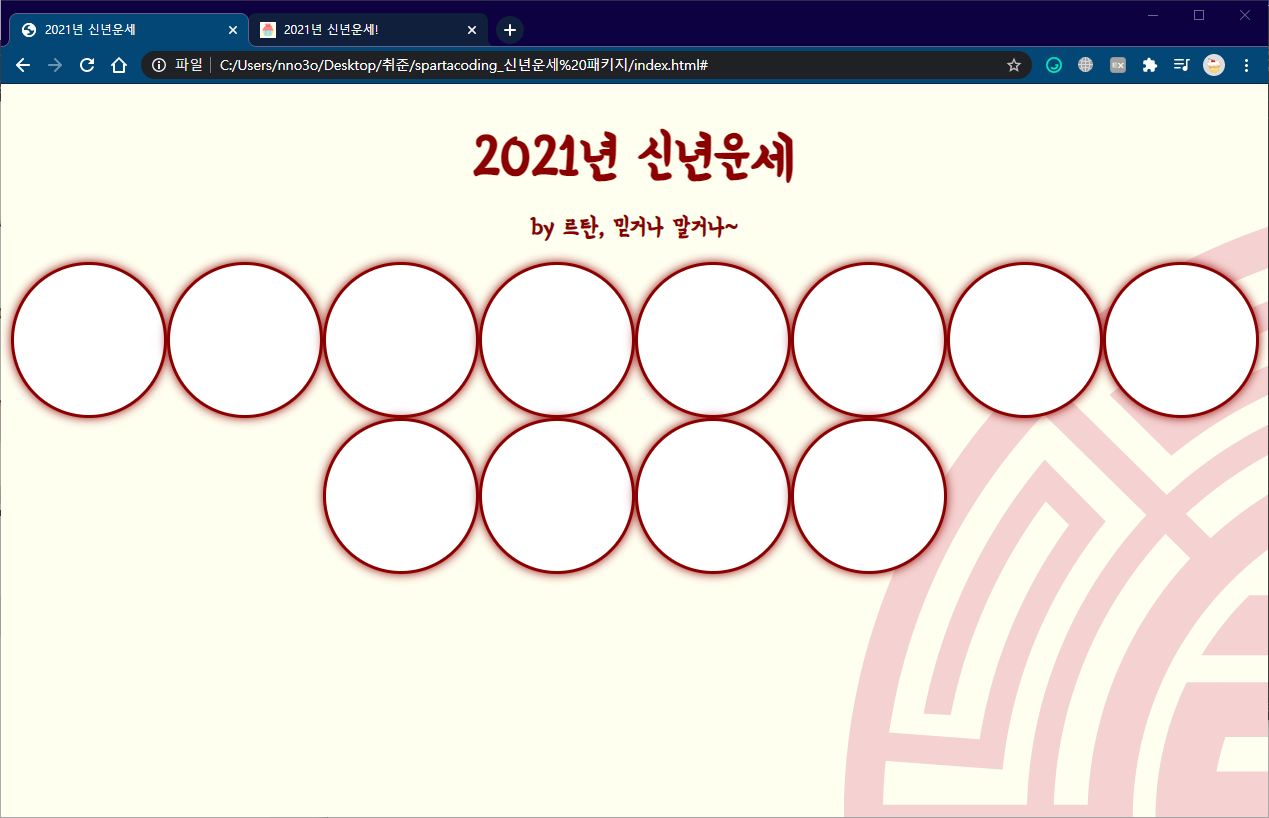
우리는 두 줄짜리 6개씩 두 줄로 맞춰야 한다.
원 하나가 150px이므로 창을 늘릴 수록 더 많은 원이 들어가게 된다.
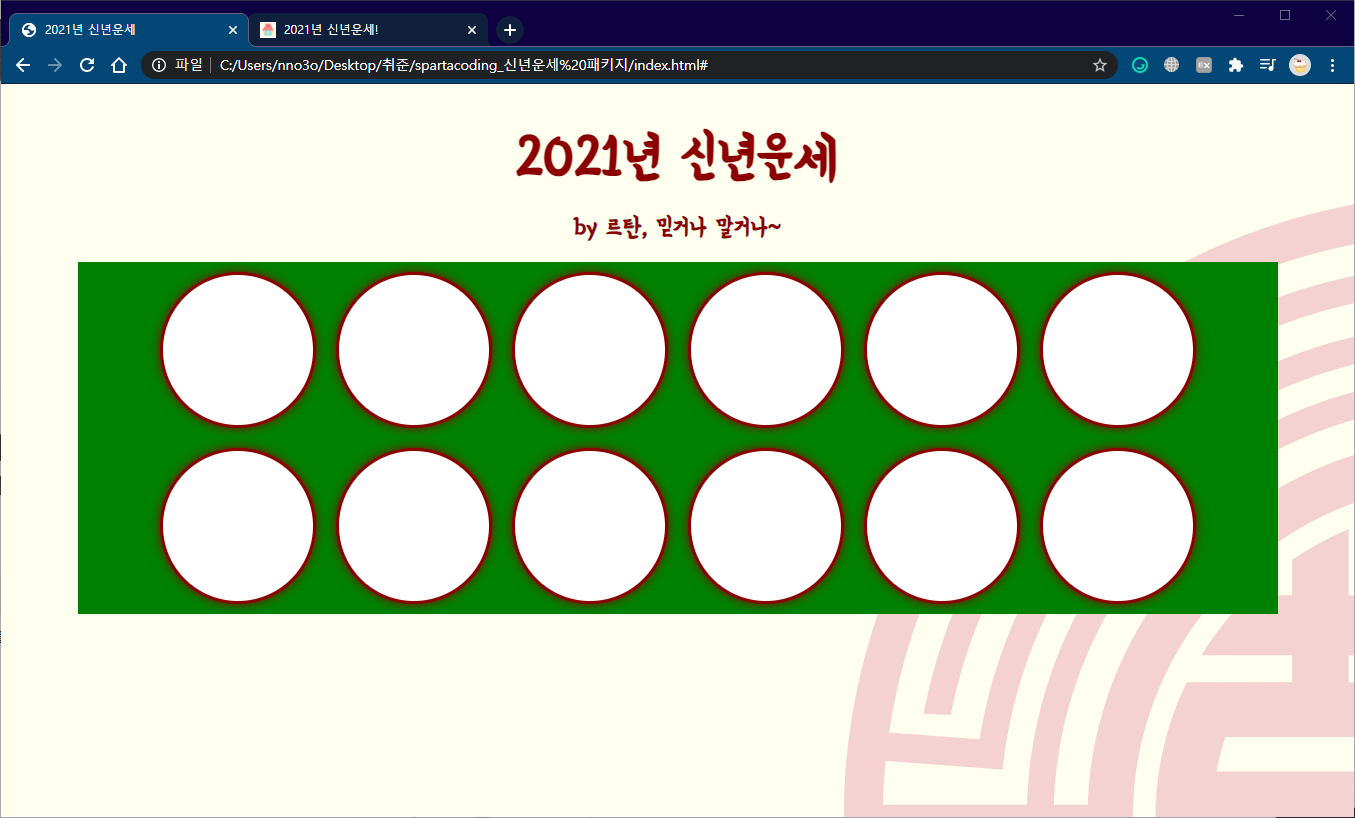
여기서 rtans라는 div의 너비를 딱 6개만 들어가도록 고정시키면 된다. 즉, width: 1200px로 두면 된다.
그리고 rtans > a 가 각각 좌우상하로 10px이 띄어지게 되도록하는 설정을 추가한다.
        .rtans {
		...
            flex-wrap: wrap;
            width:1200px;
        }
        .rtans > a {
		...
            margin: 10px;
        }
09. CSS 적용하기 - 르탄이들 (2)
1. div를 가운데 배치하기
현재 르탄이를 담은 원들이 가운데에 위치하지 않는다. 이를 확인하기 위해 rtans에 background-color: green; 속성을 추가해보면 아래와 같이 뜬다.
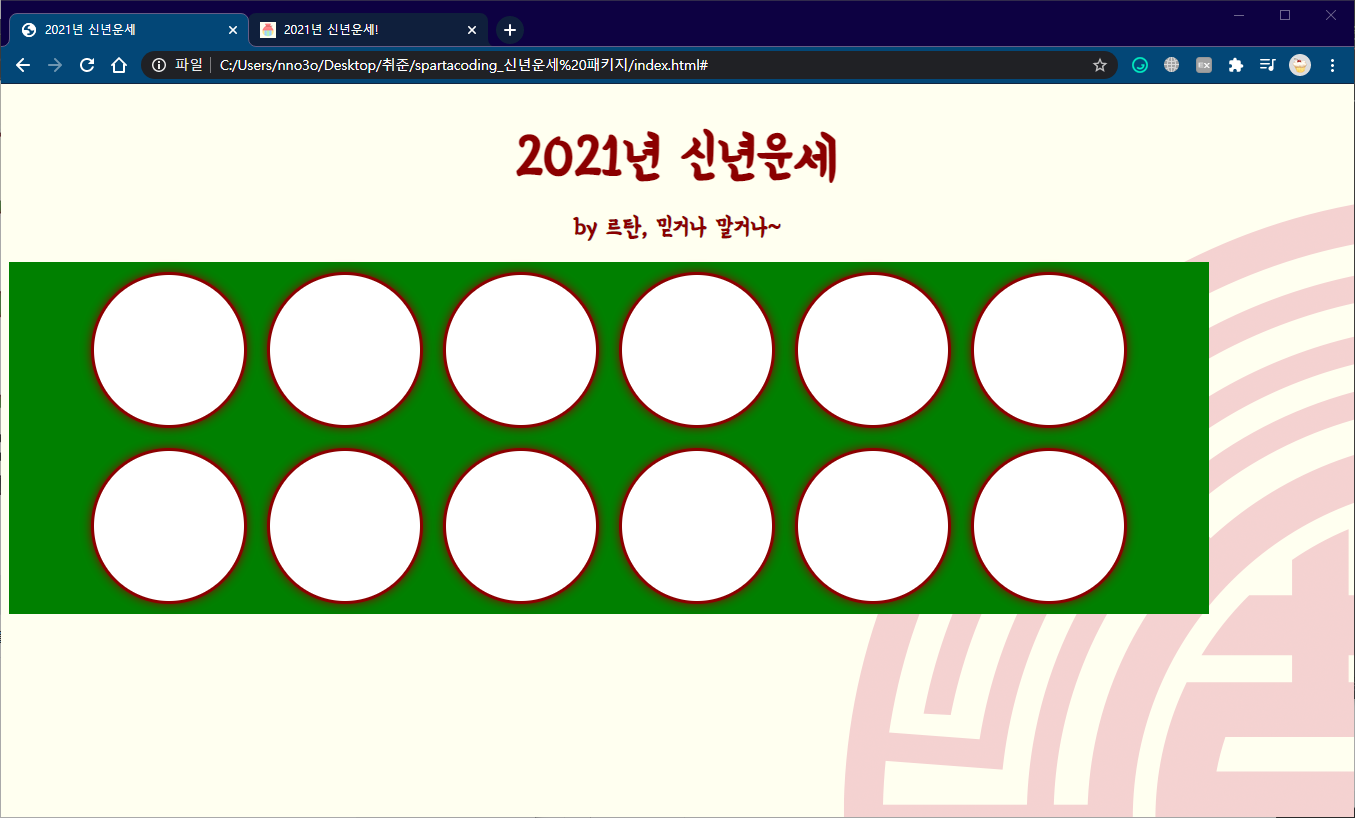
div가 왼쪽부터 시작하고 있다. 이 div를 가운데로 두기 위해서는 어떻게 해야 할까?
왼쪽, 오른쪽의 나머지 부분을 동일하게 가지면 된다. 이를 제어하는 속성이 바로 margin이다.
margin: auto라고 설정하면 좌우의 여백을 동일하게 가지게 된다.
        .rtans {
            ...
            margin: auto;
        }
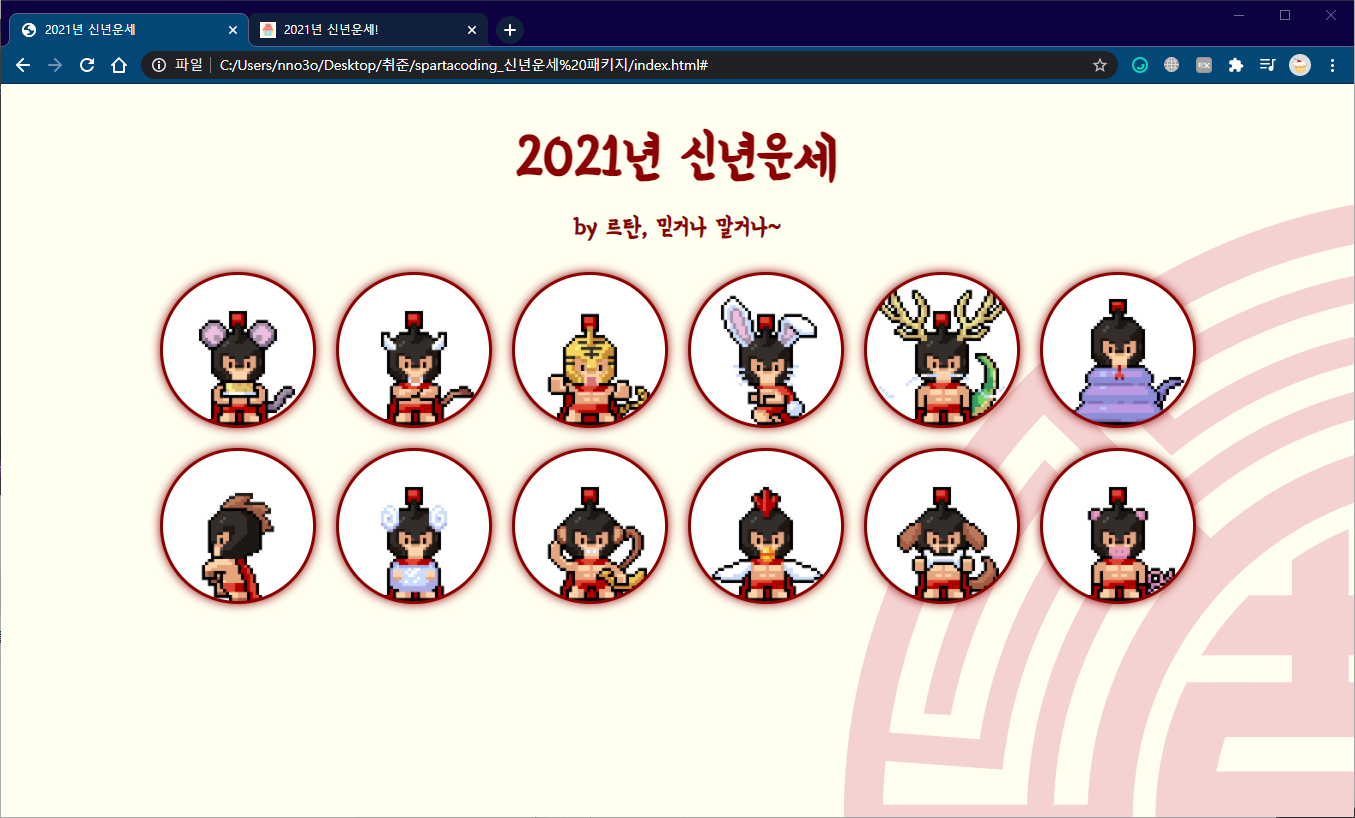
2. 르탄이 이미지 넣기
.rtan > a {
	...
	background-image: url('https://new-year.spartacodingclub.kr/images/yearS1.png');
}
위의 코드를 작성하고 페이지를 보면 아무런 변화가 없다. 왜냐하면 background-color: white;로 설정해둔 상태이기 때문이다.
르탄이 이미지를 넣기 위해선 두 가지 추가적인 세팅을 해주어야 한다.
- background-size: cover;
- background-position : center;
세 요소는 세트이니, 꼭 세 요소를 함께 입력하자!

3. 각 르탄이를 다른 이미지로 적용시키기
rtan 아래 각각 <a>들에게 다른 명찰을 준다.
.rtan1 { background-image: url('https://new-year.spartacodingclub.kr/images/yearS1.png'); }
.rtan2 { background-image: url('https://new-year.spartacodingclub.kr/images/yearS2.png'); }
.rtan3 { background-image: url('https://new-year.spartacodingclub.kr/images/yearS3.png'); }
.rtan4 { background-image: url('https://new-year.spartacodingclub.kr/images/yearS4.png'); }
.rtan5 { background-image: url('https://new-year.spartacodingclub.kr/images/yearS5.png'); }
.rtan6 { background-image: url('https://new-year.spartacodingclub.kr/images/yearS6.png'); }
.rtan7 { background-image: url('https://new-year.spartacodingclub.kr/images/yearS7.png'); }
.rtan8 { background-image: url('https://new-year.spartacodingclub.kr/images/yearS8.png'); }
.rtan9 { background-image: url('https://new-year.spartacodingclub.kr/images/yearS9.png'); }
.rtan10 { background-image: url('https://new-year.spartacodingclub.kr/images/yearS10.png'); }
.rtan11 { background-image: url('https://new-year.spartacodingclub.kr/images/yearS11.png'); }
.rtan12 { background-image: url('https://new-year.spartacodingclub.kr/images/yearS12.png'); }
<div class="rtans">
<a class="rtan1" href="#"></a>
<a class="rtan2" href="#"></a>
<a class="rtan3" href="#"></a>
<a class="rtan4" href="#"></a>
<a class="rtan5" href="#"></a>
<a class="rtan6" href="#"></a>
<a class="rtan7" href="#"></a>
<a class="rtan8" href="#"></a>
<a class="rtan9" href="#"></a>
<a class="rtan10" href="#"></a>
<a class="rtan11" href="#"></a>
<a class="rtan12" href="#"></a>
</div>
(+) 혹은 가상 클래스를 활용해도 된다.
.rtans > a:first-child {background-image: url('https://new-year.spartacodingclub.kr/images/yearS1.png');}
.rtans > a:nth-child(2) {background-image: url('...')};
...
결과
10. hover 효과주기, 다듬기
마우스를 올리면 색이 바뀌는 효과
:hover 속성 이용하기
.rtans > a:hover {background-color: darkred;}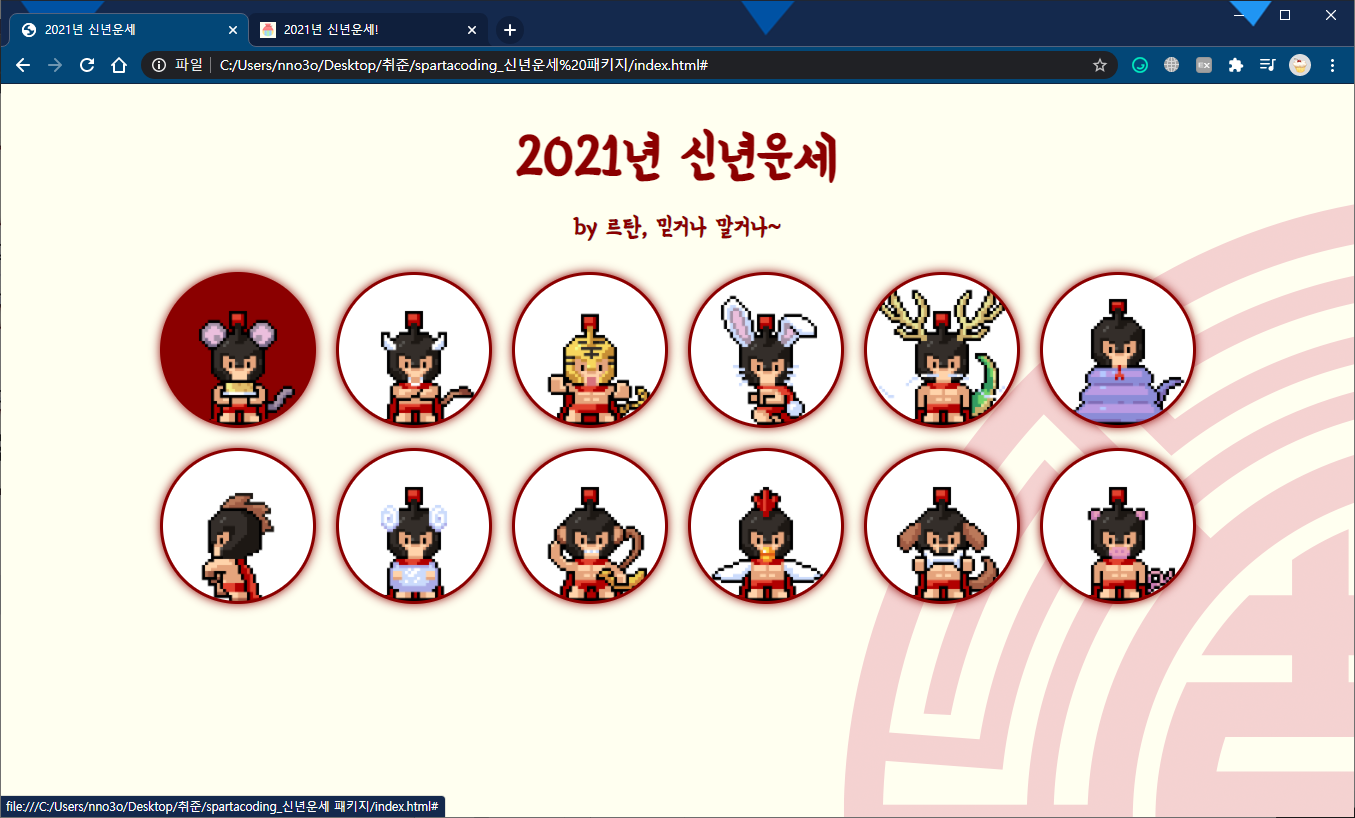
다듬기
title 글자의 상단, 하단에 여백을 준다.
.mytitle {
	...
    margin: 100px 0 50px 0;
}
11. 숙제 설명
르탄이에게 마우스를 올렸을 때 흰 글자가 나타나도록 하기
.rtans > a {
	...
	color: white;
	text-decoration: none;
	text-align:center;
	font-size:24px;
}
<div class="rtans">
<a class="rtan1" href="#">쥐</a>
<a class="rtan2" href="#">소</a>
<a class="rtan3" href="#">호랑이</a>
<a class="rtan4" href="#">토끼</a>
<a class="rtan5" href="#">용</a>
<a class="rtan6" href="#">뱀</a>
<a class="rtan7" href="#">말</a>
<a class="rtan8" href="#">양</a>
<a class="rtan9" href="#">원숭이</a>
<a class="rtan10" href="#">닭</a>
<a class="rtan11" href="#">개</a>
<a class="rtan12" href="#">돼지</a>
</div>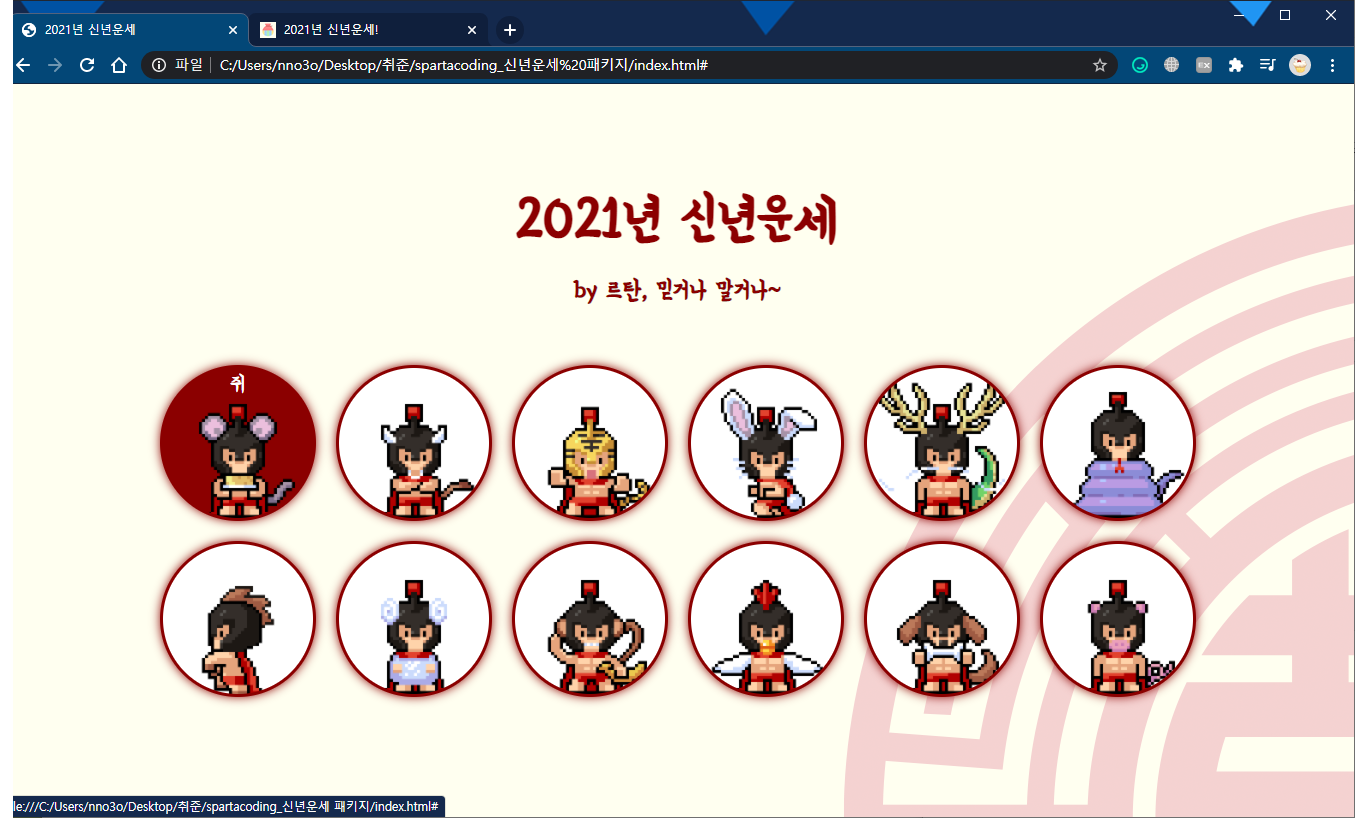
'Front-End: Web' 카테고리의 다른 글
| 추억소환 코딩 패키지 (0) | 2021.04.30 |
|---|---|
| 신년운세 패키지 - 2일차 (0) | 2021.02.08 |
| [웹 UI 개발 코칭스터디 1기] 2. 웹 접근성의 이해 (0) | 2021.02.05 |
| [웹 UI 개발 코칭스터디 1기] 리드부스터와 함께 7일차 (0) | 2021.01.16 |
| [웹 UI 개발 코칭스터디 1기] 프론트엔드 현직자 LIVE 강의 - 1 (0) | 2021.01.16 |


